简介
Taro 是一套遵循 React 语法规范的 多端开发 解决方案。
现如今市面上端的形态多种多样,Web、React-Native、微信小程序等各种端大行其道,当业务要求同时在不同的端都要求有所表现的时候,针对不同的端去编写多套代码的成本显然非常高,这时候只编写一套代码就能够适配到多端的能力就显得极为需要。
使用 Taro,我们可以只书写一套代码,再通过 Taro 的编译工具,将源代码分别编译出可以在不同端(微信/百度/支付宝/字节跳动/QQ 小程序、快应用、H5、React-Native 等)运行的代码。
一、 Taro 的安装与使用
1.1 安装
1 | $ npm install -g @tarojs/cli |
1.2 使用
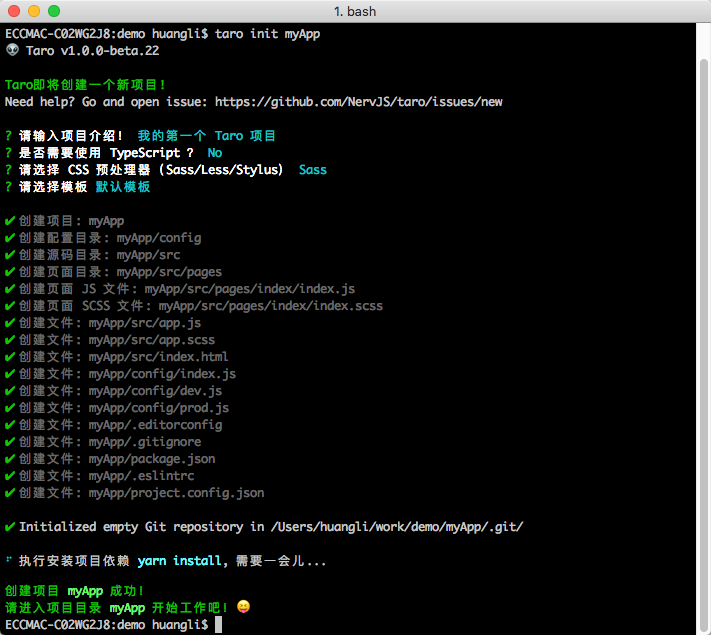
使用命令创建模板项目
1 | $ taro init myApp |
1.2.1 微信小程序
选择微信小程序模式,需要自行下载并打开微信开发者工具,然后选择项目根目录进行预览
微信小程序编译预览及打包
1 | # npm script |
1.2.2 百度小程序
选择百度小程序模式,需要自行下载并打开百度开发者工具,然后在项目编译完后选择项目根目录下 dist 目录进行预览
百度小程序编译预览及打包
1 | # npm script |
1.2.3 支付宝小程序
选择支付宝小程序模式,需要自行下载并打开支付宝小程序开发者工具,然后在项目编译完后选择项目根目录下 dist 目录进行预览
支付宝小程序编译预览及打包:
1 | # npm script |
1.2.4 H5
H5 编译预览及打包:
1 | # npm script |
1.2.5 React Native
1 | # npm script |
1.3 更新 Taro
Taro 提供了更新命令来更新 CLI 工具自身和项目中 Taro 相关的依赖。
更新 taro-cli 工具
1 | # taro |
更新项目中 Taro 相关的依赖,这个需要在你的项目下执行
1 | $ taro update project |
二、Taro 开发说明与注意事项
2.1 微信小程序开发工具的配置
由于 Taro 编译后的代码已经经过了转义和压缩,因此还需要注意微信开发者工具的项目设置
- 设置关闭 ES6 转 ES5 功能
- 设置关闭上传代码时样式自动补全
- 设置关闭代码压缩上传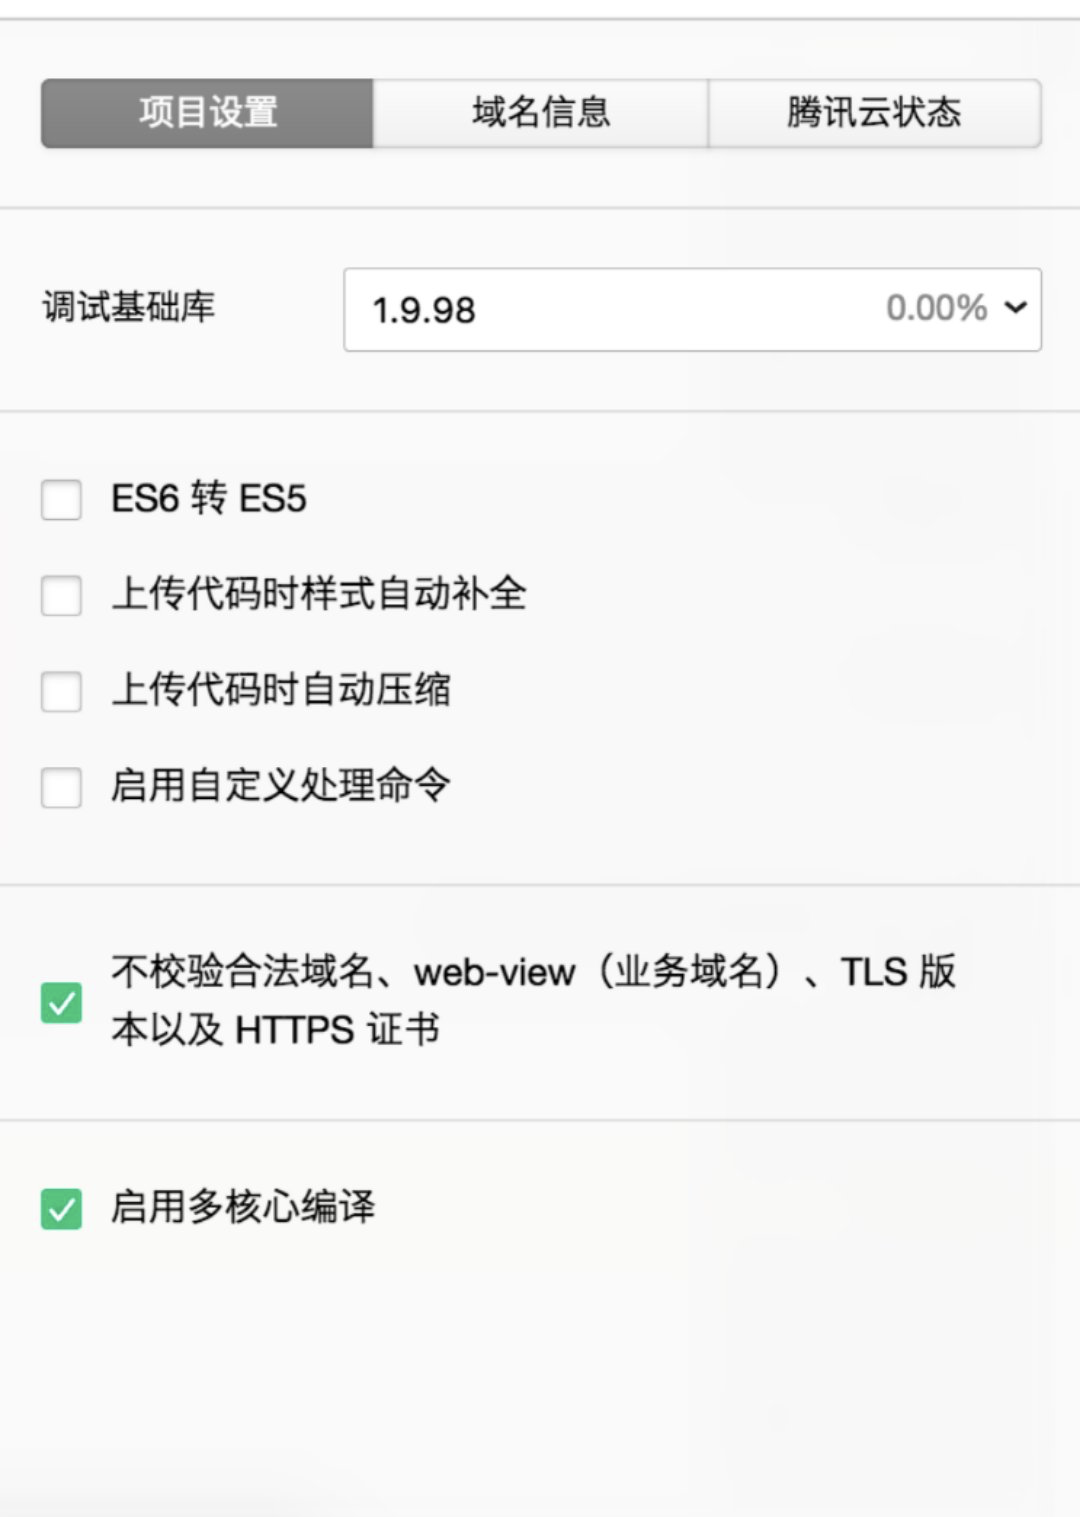
2.2 Taro 与 React 的差异
由于微信小程序的限制,React 中某些写法和特性在 Taro 中还未能实现,后续将会逐渐完善。 截止到本小册发布前,Taro 的最新版本为 1.1,因此以下讲解默认版本为 1.1
2.2.1 暂不支持在 render() 之外的方法定义 JSX
由于微信小程序的 template 不能动态传值和传入函数,Taro 暂时也没办法支持在类方法中定义 JSX
无效情况
1 | class App extends Component { |
解决方案
在 render 方法中定义
1 | class App extends Component { |
2.2.2 不能在包含 JSX 元素的 map 循环中使用 if 表达式
无效情况
1 | numbers.map((number) => { |
解决方案
尽量在 map 循环中使用条件表达式或逻辑表达式。
1 | numbers.map((number) => { |
2.2.3 不能使用 Array.map 之外的方法操作 JSX 数组
Taro 在小程序端实际上把 JSX 转换成了字符串模板,而一个原生 JSX 表达式实际上是一个 React/Nerv 元素(react - element)的构造器,因此在原生 JSX 中你可以对任何一组 React 元素进行操作。但在 Taro 中你只能使用 map 方法,Taro 转换成小程序中 wx:for…
无效情况
1 | test.push(<View />) |
解决方案
先处理好需要遍历的数组,然后再用处理好的数组调用 map 方法。
1 | numbers.filter(isOdd).map((number) => <View />) |
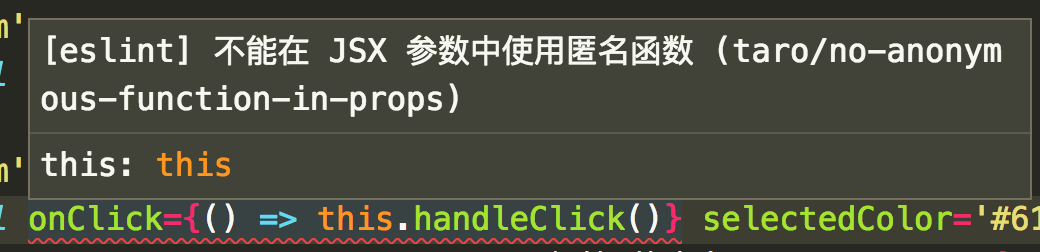
2.2.4 不能在 JSX 参数中使用匿名函数
无效情况
1 | <View onClick={() => this.handleClick()} /> |
解决方案
使用 bind 或 类参数绑定函数。
1 | <View onClick={this.props.hanldeClick.bind(this)} /> |
2.2.5 不能在 JSX 参数中使用对象展开符
1 | 微信小程序组件要求每一个传入组件的参数都必须预先设定好,而对象展开符则是动态传入不固定数量的参数。所以 Taro 没有办法支持该功能 |
无效情况
1 | <View {...this.props} /> |
解决方案
开发者自行赋值:
1 | render () { |
2.2.6 不允许在 JSX 参数(props)中传入 JSX 元素
由于微信小程序内置的组件化的系统不能通过属性(props) 传函数,而 props 传递函数可以说是 React 体系的根基之一,我们只能自己实现一套组件化系统。而自制的组件化系统不能使用内置组件化的 slot 功能。两权相害取其轻,我们暂时只能不支持该功能…
无效情况
1 | <Custom child={<View />} /> |
解决方案
通过 props 传值在 JSX 模板中预先判定显示内容,或通过 props.children 来嵌套子组件
2.2.7 不支持无状态组件(Stateless Component)
由于微信的 template 能力有限,不支持动态传值和函数,Taro 暂时只支持一个文件自定义一个组件。为了避免开发者疑惑,暂时不支持定义 Stateless Component
无效情况
1 | function Test () { |
解决方案
使用 class 定义组件。
1 | class App extends Component { |
2.3 命名规范
Taro 函数命名使用驼峰命名法,如 onClick,由于微信小程序的 WXML 不支持传递函数,函数名编译后会以字符串的形式绑定在 WXML 上,囿于 WXML 的限制,函数名有三项限制
- 方法名不能含有数字
- 方法名不能以下划线开头或结尾
- 方法名的长度不能大于 20
请遵守以上规则,否则编译后的代码在微信小程序中会报以下错误

2.4 推荐安装 ESLint 编辑器插件
Taro 有些写法跟 React 有些差异,可以通过安装 ESLint 相关的编辑器插件来获得人性化的提示。由于不同编辑器安装的插件有所不同,具体安装方法请自行搜索,这里不再赘述。 如下图,就是安装插件后获得的提示

2.5 最佳编码方式
组件传递函数属性名以 on 开头
在 Taro 中,父组件要往子组件传递函数,属性名必须以 on 开头
1 | // 调用 Custom 组件,传入 handleEvent 函数,属性名为 `onTrigger` |
这是因为,微信小程序端组件化是不能直接传递函数类型给子组件的,在 Taro 中是借助组件的事件机制来实现这一特性,而小程序中传入事件的时候属性名写法为 bindmyevent 或者 bind:myevent
1 | <!-- 当自定义组件触发“myevent”事件时,调用“onMyEvent”方法 --> |
所以 Taro 中约定组件传递函数属性名以 on 开头,同时这也和内置组件的事件绑定写法保持一致了…
小程序端不要在组件中打印传入的函数
前面已经提到小程序端的组件传入函数的原理,所以在小程序端不要在组件中打印传入的函数,因为拿不到结果,但是 this.props.onXxx && this.props.onXxx() 这种判断函数是否传入来进行调用的写法是完全支持的…
小程序端不要将在模板中用到的数据设置为 undefined
- 由于小程序不支持将 data 中任何一项的 value 设为 undefined ,在 setState 的时候也请避免这么用。你可以使用 null 来替代。
- 小程序端不要在组件中打印 this.props.children
在微信小程序端是通过来实现往自定义组件中传入元素的,而 Taro 利用 this.props.children 在编译时实现了这一功能, this.props.children 会直接被编译成 标签,所以它在小程序端属于语法糖的存在,请不要在组件中打印它…
组件 state 与 props 里字段重名的问题
不要在 state 与 props 上用同名的字段,因为这些被字段在微信小程序中都会挂在 data 上
小程序中页面生命周期 componentWillMount 不一致问题
由于微信小程序里页面在 onLoad 时才能拿到页面的路由参数,而页面 onLoad 前组件都已经 attached 了。因此页面的 componentWillMount 可能会与预期不太一致。例如:
1 | // 错误写法 |
对于不需要等到页面 willMount 之后取路由参数的页面则没有任何影响…
JS 编码必须用单引号
在 Taro 中,JS 代码里必须书写单引号,特别是 JSX 中,如果出现双引号,可能会导致编译错误
process.env 的使用
不要以解构的方式来获取通过 env 配置的 process.env 环境变量,请直接以完整书写的方式 process.env.NODE_ENV 来进行使用
1 | // 错误写法,不支持 |
预加载
在微信小程序中,从调用 Taro.navigateTo、Taro.redirectTo 或 Taro.switchTab 后,到页面触发 componentWillMount 会有一定延时。因此一些网络请求可以提前到发起跳转前一刻去请求
Taro 提供了 componentWillPreload 钩子,它接收页面跳转的参数作为参数。可以把需要预加载的内容通过 return 返回,然后在页面触发 componentWillMount 后即可通过 this.$preloadData 获取到预加载的内容。…
1 | class Index extends Component { |
三、Taro 设计思想及架构
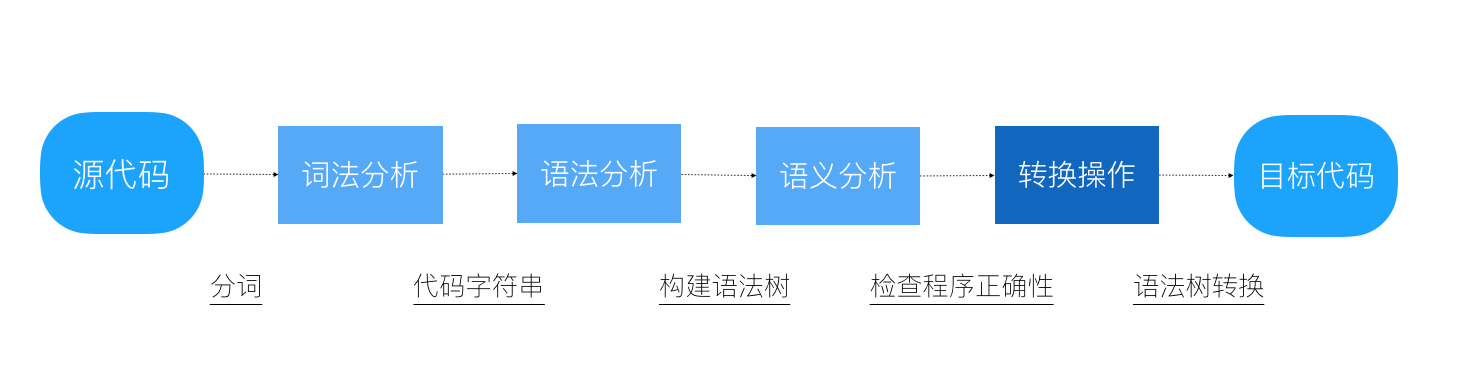
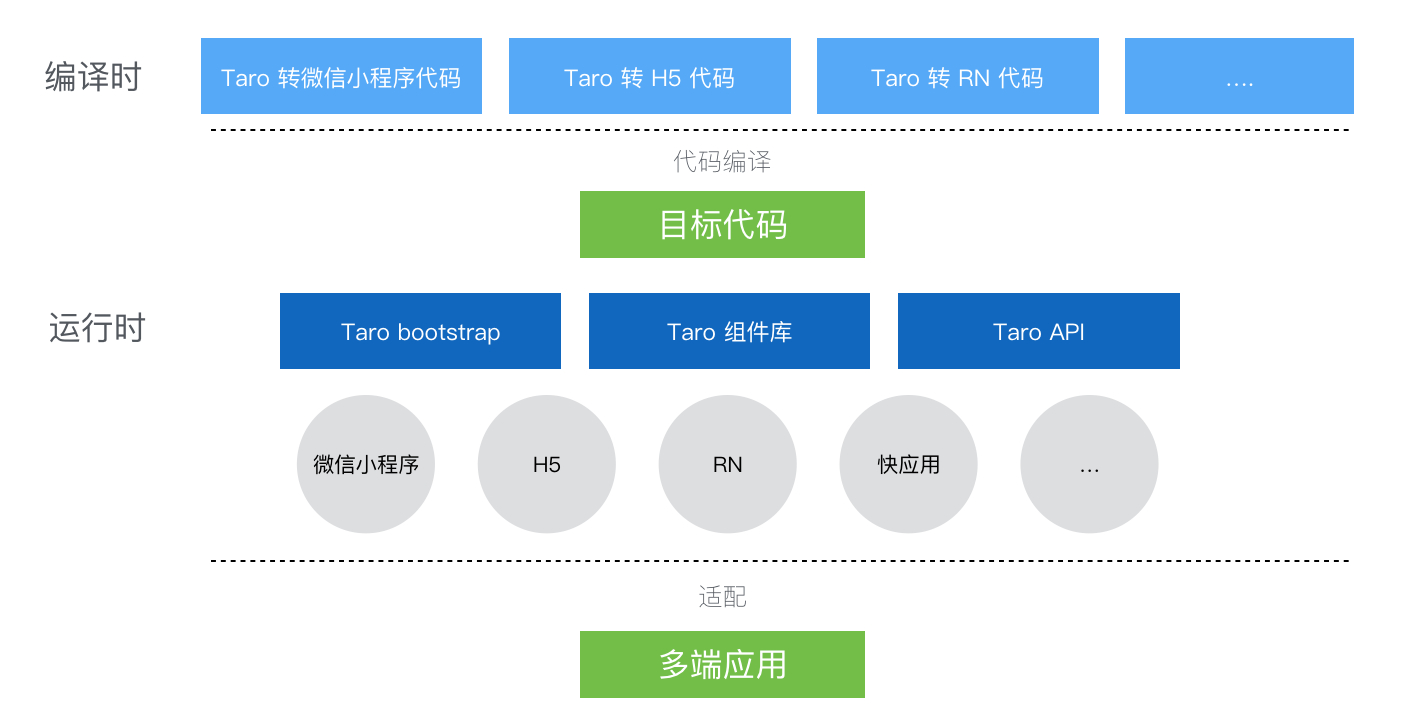
在 Taro 中采用的是编译原理的思想,所谓编译原理,就是一个对输入的源代码进行语法分析,语法树构建,随后对语法树进行转换操作再解析生成目标代码的过程。
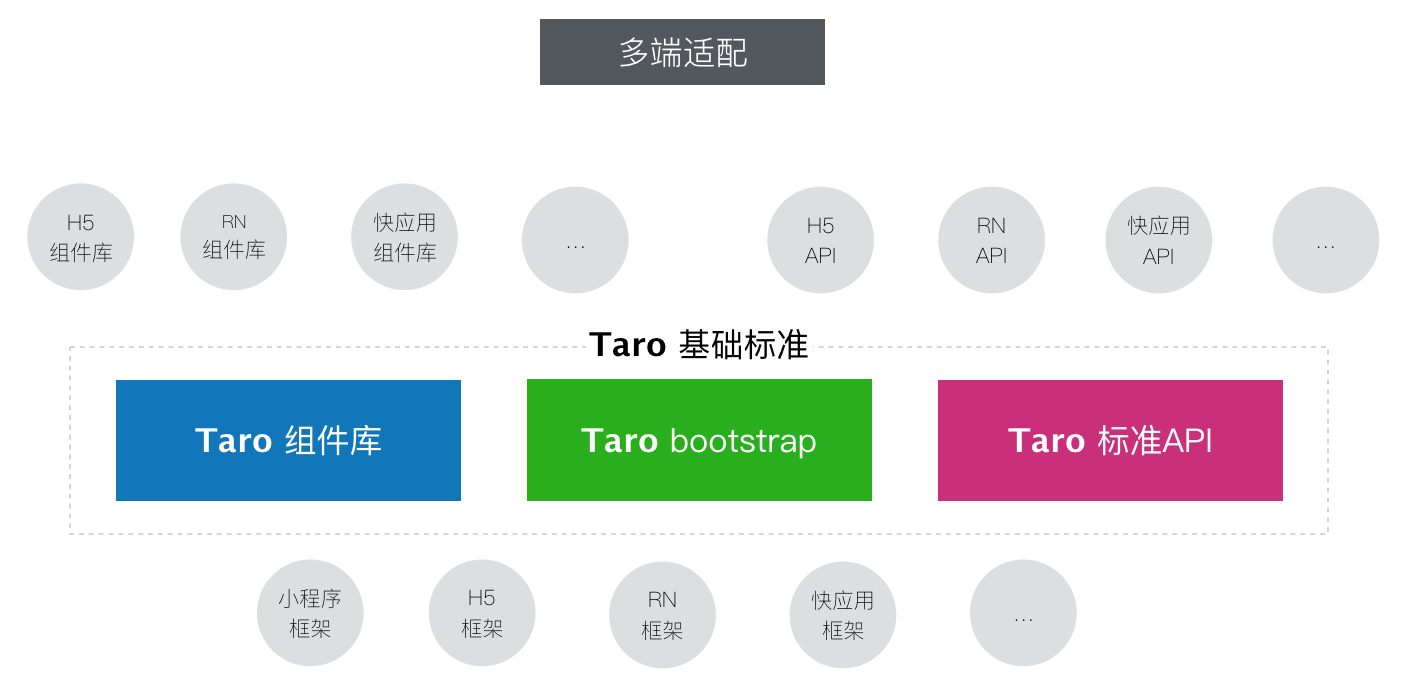
3.1 抹平多端差异
基于编译原理,我们已经可以将 Taro 源码编译成不同端上可以运行的代码了,但是这对于实现多端开发还是远远不够。因为不同的平台都有自己的特性,每一个平台都不尽相同,这些差异主要体现在不同的组件标准与不同的 API 标准以及不同的运行机制上
以小程序和 Web 端为例
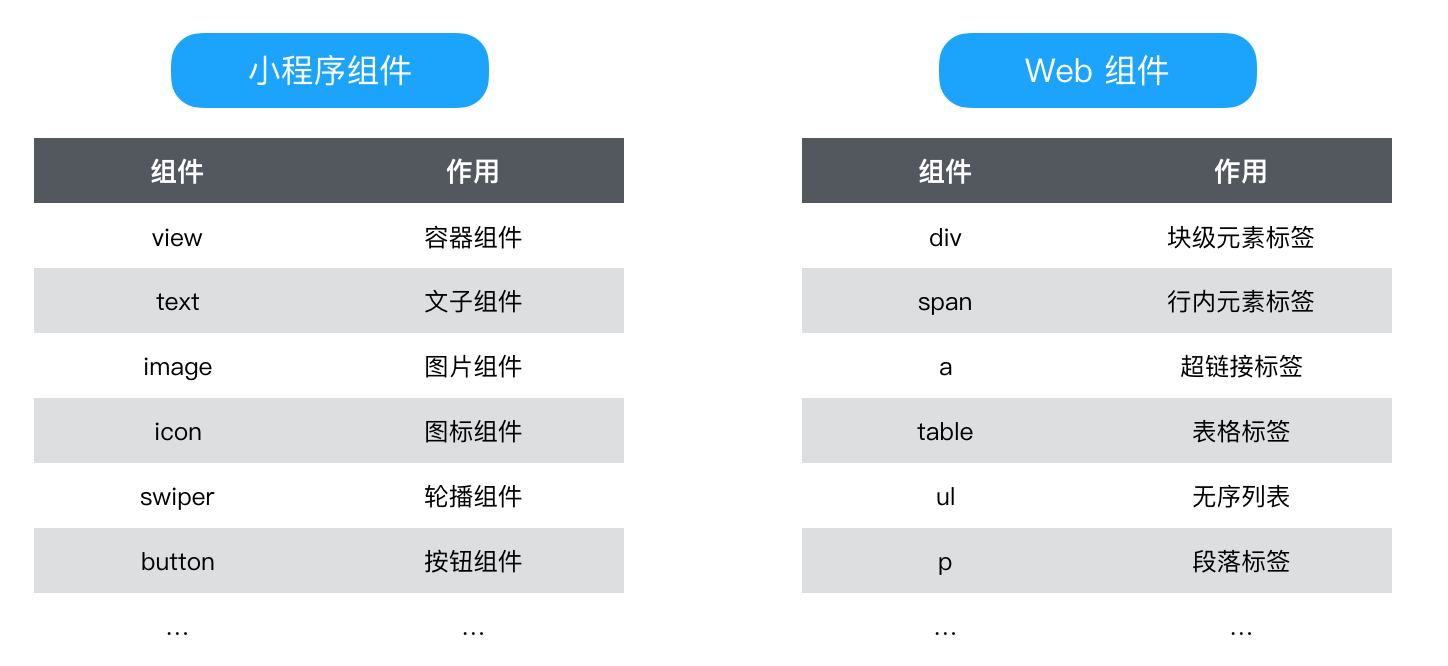
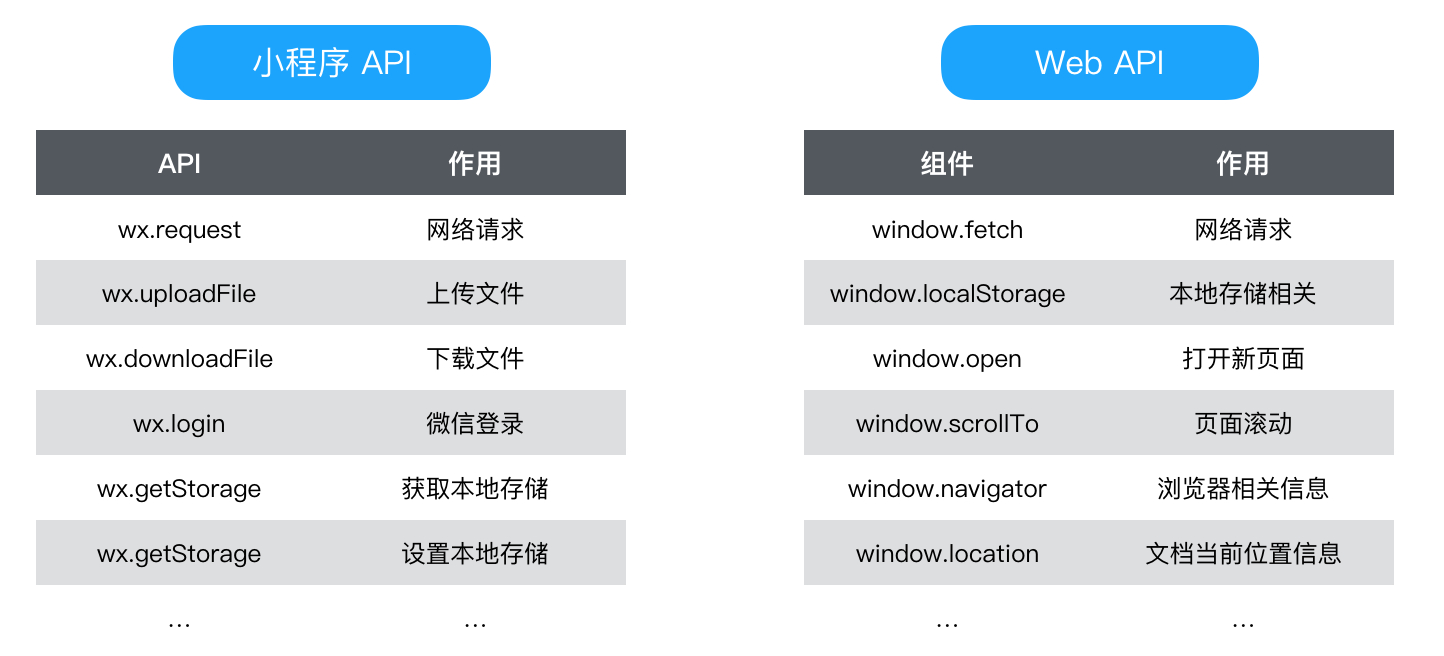
- 可以看出小程序和 Web 端上组件标准与 API 标准有很大差异,这些差异仅仅通过代码编译手段是无法抹平的,例如你不能直接在编译时将小程序的
直接编译成 ,因为他们虽然看上去有些类似,但是他们的组件属性有很大不同的,仅仅依靠代码编译,无法做到一致,同理,众多 API 也面临一样的情况。针对这样的情况,Taro 采用了定制一套运行时标准来抹平不同平台之间的差异 - 这一套标准主要以三个部分组成,包括标准运行时框架、标准基础组件库、标准端能力 API,其中运行时框架和 API 对应 @taro/taro,组件库对应 @tarojs/components,通过在不同端实现这些标准,从而达到去差异化的目的…
四、CLI 原理及不同端的运行机制
4.1 taro-cli 包
4.1.1 Taro 命令
taro-cli 包位于 Taro 工程的 Packages 目录下,通过 npm install -g @tarojs/cli 全局安装后,将会生成一个 Taro 命令。主要负责项目初始化、编译、构建等。直接在命令行输入 Taro ,会看到如下提示…
1 | ➜ taro |
里面包含了 Taro 所有命令用法及作用。
4.1.2 包管理与发布
- 首先,我们需要了解 taro-cli 包与 Taro 工程的关系。
- 将 Taro 工程 Clone 之后,可以看到工程的目录结构如下,整体结构还是比较清晰的:
1 | . |
Taro 项目主要是由一系列 NPM 包组成,位于工程的 Packages 目录下。它的包管理方式和 Babel 项目一样,将整个项目作为一个 monorepo 来进行管理,并且同样使用了包管理工具 Lerna
Packages 目录下十几个包中,最常用的项目初始化与构建的命令行工具 Taro CLI 就是其中一个。在 Taro 工程根目录运行 lerna publish 命令之后,lerna.json 里面配置好的所有的包会被发布到 NPM 上
4.1.3 taro-cli 包的目录结构如下
1 | ./ |
通过上面的目录树可以发现,taro-cli 工程的文件并不算多,主要目录有:/bin、/src、/template
4.2 用到的核心库
- tj/commander.js Node.js - 命令行接口全面的解决方案
- jprichardson/node-fs-extra - 在 Node.js 的 fs 基础上增加了一些新的方法,更好用,还可以拷贝模板。
- chalk/chalk - 可以用于控制终端输出字符串的样式
- SBoudrias/Inquirer.js - Node.js 命令行交互工具,通用的命令行用户界面集合,可以和用户进行交互
- sindresorhus/ora - 实现加载中的状态是一个 Loading 加前面转起来的小圈圈,成功了是一个 Success 加前面一个小钩钩
- SBoudrias/mem-fs-editor - 提供一系列 API,方便操作模板文件
- shelljs/shelljs - ShellJS 是 Node.js 扩展,用于实现 Unix shell 命令执行。
4.3 Taro Init
当我们全局安装 taro-cli 包之后,我们的命令行里就有了 Taro 命令
- 那么 Taro 命令是怎样添加进去的呢?其原因在于 package.json 里面的 bin 字段:
1 | "bin": { |
上面代码指定,Taro 命令对应的可执行文件为 bin/taro 。NPM 会寻找这个文件,在 [prefix]/bin 目录下建立符号链接。在上面的例子中,Taro 会建立符号链接 [prefix]/bin/taro。由于 [prefix]/bin 目录会在运行时加入系统的 PATH 变量,因此在运行 NPM 时,就可以不带路径,直接通过命令来调用这些脚本。
- 关于 prefix,可以通过 npm config get prefix 获取。
1 | $ npm config get prefix |
通过下列命令可以更加清晰的看到它们之间的符号链接…
1 | $ ls -al `which taro` |
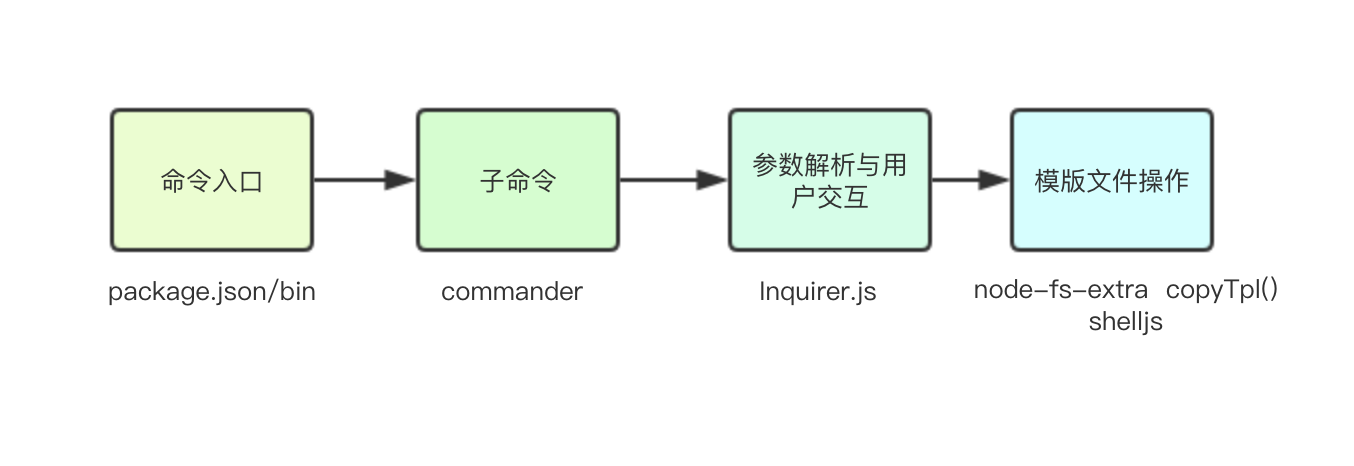
4.3.1 命令关联与参数解析
这里就不得不提到一个有用的包:tj/commander.js ,Node.js 命令行接口全面的解决方案,灵感来自于 Ruby’s commander。可以自动的解析命令和参数,合并多选项,处理短参等等,功能强大,上手简单
更主要的,commander 支持 Git 风格的子命令处理,可以根据子命令自动引导到以特定格式命名的命令执行文件,文件名的格式是 [command]-[subcommand],例如
- taro init => taro-init
- taro build => taro-build
- /bin/taro 文件内容不多,核心代码也就那几行 .command() 命令:
1 |
|
通过上面代码可以发现,init,build ,update 等命令都是通过.command(name, description)方法定义的,然后通过 .parse(arg) 方法解析参数
4.3.2 参数解析及与用户交互
- commander 包可以自动解析命令和参数,在配置好命令之后,还能够自动生成 help(帮助)命令和 version(版本查看) 命令。并且通过 program.args 便可以获取命令行的参数,然后再根据参数来调用不同的脚本。
- 但当我们运行 taro init 命令后,如下所示的命令行交互又是怎么实现的呢?…
1 | $ taro init taroDemo |
这里使用的是 SBoudrias/Inquirer.js 来处理命令行交互。
用法其实很简单
1 | const inquirer = require('inquirer') // npm i inquirer -D |
- prompt()接受一个问题对象的数据,在用户与终端交互过程中,将用户的输入存放在一个答案对象中,然后返回一个 Promise,通过 then()获取到这个答案对象。
借此,新项目的名称、版本号、描述等信息可以直接通过终端交互插入到项目模板中,完善交互流程。 - 当然,交互的问题不仅限于此,可以根据自己项目的情况,添加更多的交互问题。inquirer.js 强大的地方在于,支持很多种交互类型,除了简单的 input,还有 confirm、list、password、checkbox 等,具体可以参见项目的工程 README。
此外,你在执行异步操作的过程中,还可以使用 sindresorhus/ora 来添加一下 Loading 效果。使用 chalk/chalk 给终端的输出添加各种样式…
4.3.3 模版文件操作
最后就是模版文件操作了,主要分为两大块:
- 将输入的内容插入到模板中
- 根据命令创建对应目录结构,copy 文件
- 更新已存在文件内容
这些操作基本都是在 /template/index.js 文件里。
这里还用到了 shelljs/shelljs 执行 shell 脚本,如初始化 Git: git init,项目初始化之后安装依赖 npm install 等
拷贝模板文件
拷贝模版文件主要是使用 jprichardson/node-fs-extra 的 copyTpl()方法,此方法使用 ejs 模板语法,可以将输入的内容插入到模版的对应位置:
1 | this.fs.copyTpl( |
4.4 Taro Build
- taro build 命令是整个 Taro 项目的灵魂和核心,主要负责多端代码编译(H5,小程序,React Native 等)。
- Taro 命令的关联,参数解析等和 taro init 其实是一模一样的,那么最关键的代码转换部分是怎样实现的呢?…
4.4.1 编译工作流与抽象语法树(AST)
Taro 的核心部分就是将代码编译成其他端(H5、小程序、React Native 等)代码。一般来说,将一种结构化语言的代码编译成另一种类似的结构化语言的代码包括以下几个步骤

首先是 Parse,将代码解析(Parse)成抽象语法树(Abstract Syntex Tree),然后对 AST 进行遍历(traverse)和替换(replace)(这对于前端来说其实并不陌生,可以类比 DOM 树的操作),最后是生成(generate),根据新的 AST 生成编译后的代码…
4.4.2 Babel 模块
Babel 是一个通用的多功能的 JavaScript 编译器,更确切地说是源码到源码的编译器,通常也叫做转换编译器(transpiler)。 意思是说你为 Babel 提供一些 JavaScript 代码,Babel 更改这些代码,然后返回给你新生成的代码…
4.4.3 解析页面 Config 配置
在业务代码编译成小程序的代码过程中,有一步是将页面入口 JS 的 Config 属性解析出来,并写入 *.json 文件,供小程序使用。那么这一步是怎么实现的呢?这里将这部分功能的关键代码抽取出来:
1 | // 1. babel-traverse方法, 遍历和更新节点 |